Create Adorable DIY Cotton Swab Sheep for Fun Crafting at Home
There’s something deeply soothing about the gentle act of gluing cotton swabs onto cardboard and watching a fluffy little sheep emerge. Each swab has its own unique softness and lightness — and placing them one by one, from the outer edges toward the center, is a meditation in itself.
This cozy little creature takes about 15 minutes of hands-on time (plus drying) and is a delightful family activity for children with adult supervision. It makes a sweet shelf or desk companion — a reminder to take peaceful moments for yourself.
Materials You’ll Need
- Cotton swabs (about 30–50, easy to find at any store)
- White craft glue (clear-drying, gentle to use)
- Black construction paper (for the eyes and feet)
- Scissors
- A small piece of cardboard (for a sturdy base)
- Optional: light pink or pastel paper (for extra decoration)
Prep time: 15 minutes · Drying: a few hours
Step 1: Cut the Base
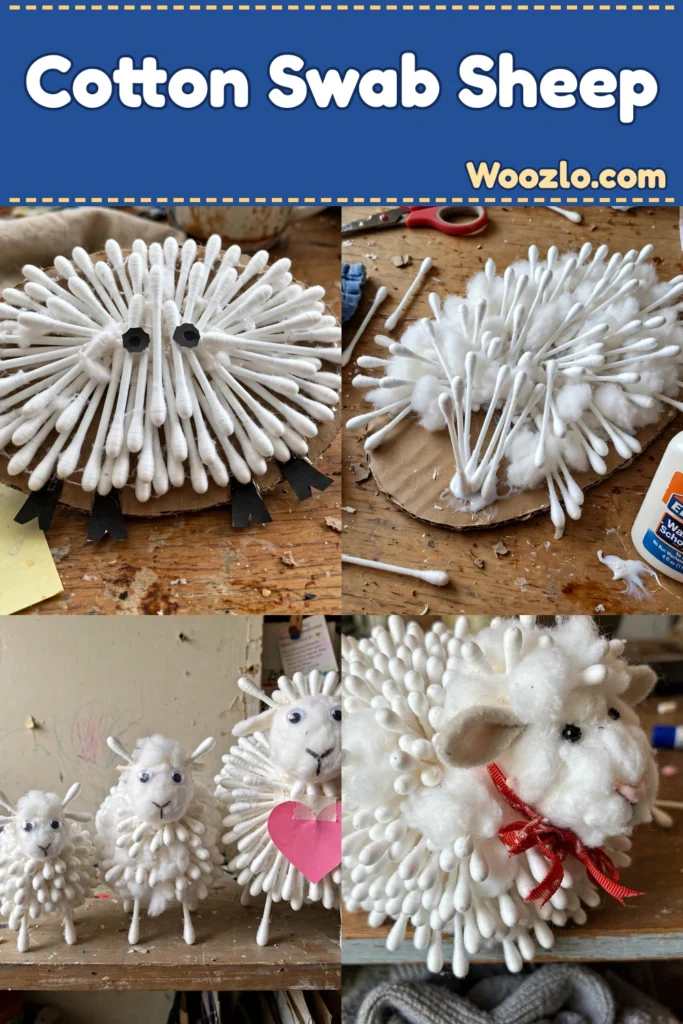
Start by cutting a piece of cardboard into the shape of a small oval. This will serve as the base for your sheep.
Step 2: Prepare a Swab
Take your cotton swabs and carefully dip one end into the glue. This prepares the swab for sticking onto the cardboard.
Step 3: Place the Swabs
Begin placing the swabs closely together on the cardboard, working from the outer edges toward the center. Enjoy the soft, fluffy texture building up.
Step 4: Let the Base Dry
Once you have covered the base with swabs, let it dry for a moment. Take in the sight of your creation so far.
Step 5: Cut the Eyes
While the base dries, cut two small circles from the black construction paper for the sheep’s eyes.
Step 6: Attach the Eyes
After the base is dry to the touch, gently attach the eyes in the center. A small dab of glue will hold them firmly in place.
Step 7: Add the Feet
For the feet, cut four tiny ovals from the black paper. Glue them to the base — imagine how this sheep might frolic in a meadow.
Step 8: Dry Completely
Once everything is glued down securely, give your sheep time to dry completely — a few hours should suffice. This final step adds stability.
Step 9: Add a Personal Touch (Optional)
Consider making a small heart shape from the optional pastel paper and gluing it to your sheep — a lovely way to infuse warmth and charm.
Enjoying the Finished Piece
The Cotton Swab Sheep stands proudly on your shelf or desk. Each time you glance at its fluffy form, you’re transported back to the soothing experience of crafting. Make several and gift them to friends, spreading joy with your gentle creations. Store in a safe, dry spot away from direct sunlight to keep the colors intact and protect the glue.
Tips and Variations
- Colorful swabs: Try pastel or patterned cotton swabs for a lively twist.
- A whole flock: Create sheep in various sizes — ideal for a cheerful display.
- More texture: Use pom-poms to enhance the fluffiness.
- Playful details: Add a small bell or a ribbon around the neck for extra charm.
Quick Questions
Is this suitable for children? Absolutely — ideal for children with adult supervision. The soft materials and simple steps make it a delightful family activity.
How long does the sheep take to dry? Usually a few hours. Let it dry well so all parts are secure.
What if I don’t have cotton swabs? Substitute small pieces of cotton balls or torn strips of soft paper — still fluffy, just a different texture.
Can I use colored glue? Yes! Colored glue adds extra charm and a unique look — just be mindful of how it changes the final appearance.