Craft a Fun DIY Bottle Cap Jellyfish Wind Chime at Home
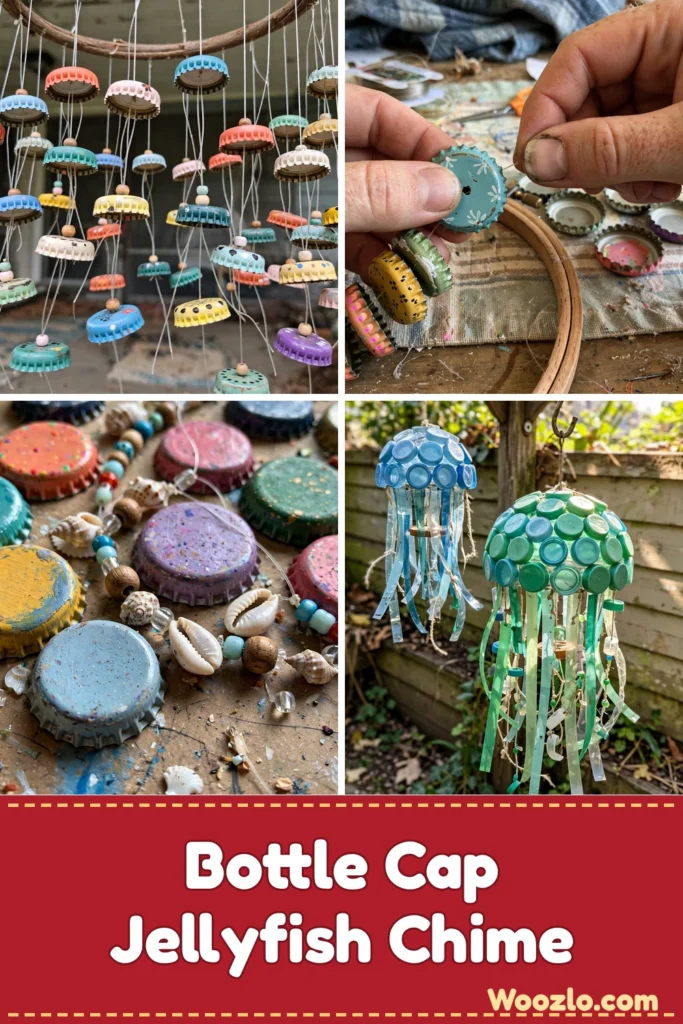
Ten to fifteen recycled bottle caps, some fishing line, and a hoop become a whimsical jellyfish wind chime that sounds like the sea. This is a perfect rainy-afternoon project: prep takes about 10 minutes, the build is all threading and knotting, and the delicate tinkling of the caps in the breeze is genuinely lovely.
The trick to the jellyfish look is varying the twine lengths so the caps hang at different levels, mimicking tentacles bobbing in the ocean. Paint the caps first if you want extra color — or leave them raw for an industrial-coastal look.
What You’ll Need
- Recycled bottle caps (approx. 10–15)
- Strong fishing line or thin twine
- A sturdy wooden or metal hoop (for the base)
- Hot glue gun and glue sticks (optional, for extra security)
- Scissors
- Decorative beads (optional)
- Paint (optional, for personalizing the caps)
- Small weights, like washers (optional, for stability)
Step 1: Clean the Caps
Clean your bottle caps, removing any labels or residue. Smooth edges are easy to handle as you work.
Step 2: Paint (Optional)
If you are painting, lay the caps on a flat surface and brush on your color. Let them dry completely.
Step 3: Cut the Lines
Cut your fishing line or twine into several lengths of varying sizes. The variety adds a playful touch, like a jellyfish dancing in the water.
Step 4: Thread the Caps
Thread a bottle cap onto each piece of twine, securing it in place. Add a small dollop of hot glue inside the cap if it needs to stay steady.
Step 5: Knot
Tie a knot at the end of each piece of twine to secure the caps.
Step 6: Attach to the Hoop
Tie each twine piece around the wooden or metal hoop. The gentle tug of the line feels satisfying.
Step 7: Adjust the Lengths
Adjust the twine so some pieces hang longer than others — this mimics the natural movement of jellyfish bobbing in the ocean.
Step 8: Secure and Decorate
Double-check the knots and secure them with additional glue if needed. Add decorative beads to the twine for sparks of color, like sunlight breaking through waves.
Step 9: Hang
Find a sunny spot to hang your wind chime — a window, porch, or garden corner where it catches the light — and enjoy it dancing in the gentle breeze.
Make It Your Own
- Mix caps: different colors and types make each chime one-of-a-kind.
- Coastal add-ins: shells or small stones deepen the seaside feel.
- Scale it: a large chime becomes a focal point; small ones are playful accents.
- Make it social: invite family or friends to craft along.
- Place it thoughtfully: choose a spot where the chime’s mood matches the space.
FAQs
Not enough bottle caps? Substitute small tin cans, pieces of wood, or handmade paper shapes — crafting is about finding what works.
How do I make it more colorful? Paints, permanent markers, or colored twine. Personalize it to your taste.
How do I keep it balanced? Rearrange the twine lengths and placement until it hangs evenly.
No fishing line? Any string or embroidery floss works — the goal is secure caps with room to sway.
Can it hang indoors? Yes — find a hook or sturdy spot; it brings coastal joy to any room.
Care
Indoors, a gentle dusting now and then keeps it fresh. For outdoor displays, bring it inside during harsh weather to prolong its life. If a cap falls off over time, repairs are easy — reattach it and the chime carries on with its story.