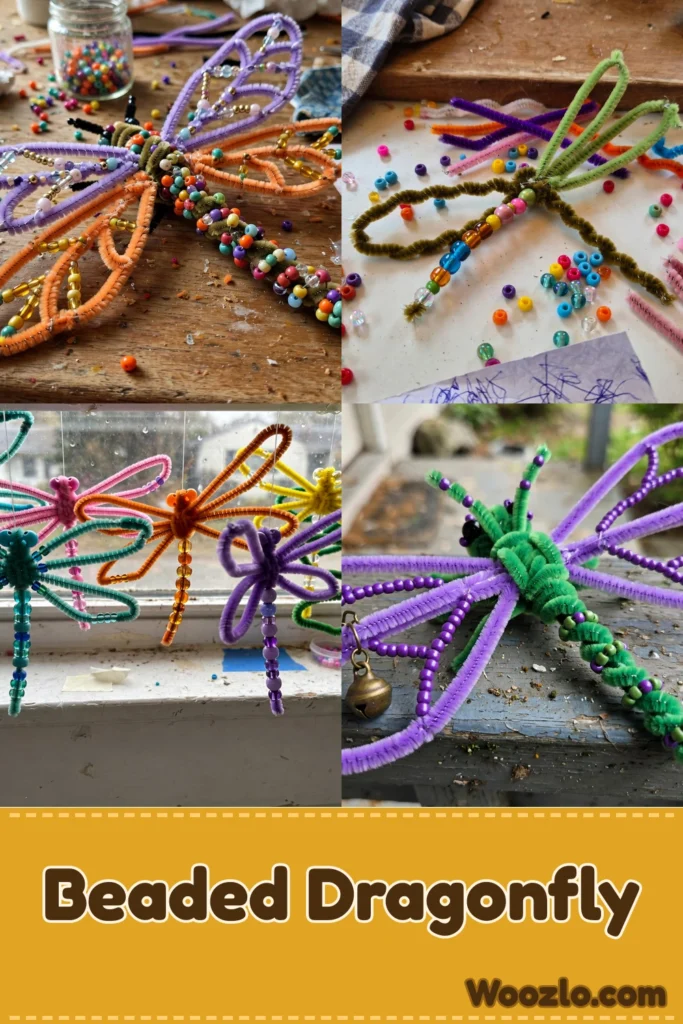
Create a Stunning DIY Beaded Pipe Cleaner Dragonfly for Kids
Are you looking for a craft that’s as calming to make as it is beautiful to look at? This beaded pipe cleaner dragonfly is it! The fuzzy pipe cleaners sliding through your fingers, the gentle click of beads as they meet, the soft repetition of bending and shaping — it all becomes like a meditation.
Each dragonfly takes about 30–40 minutes, and no two are alike: the beads, the colors, the patterns are all up to the maker. It’s perfect for shared family time (just supervise the scissors and small beads), and the finished dragonfly flutters beautifully on a windowsill or shelf.
Materials You’ll Need
- 3 pipe cleaners (any colors you like)
- Assorted beads (vary shapes, sizes, and colors for visual interest)
- Scissors (for trimming pipe cleaners)
- Optional: string or yarn (for hanging)
- Optional: glitter or decorative elements (to personalize)
Step 1: Make the Body
Start by choosing a pipe cleaner for the dragonfly’s body. Bend it in half to find the center point — this will be the dragonfly’s thorax.
Step 2: Twist the Body
From the center, gently twist the two sides together, creating a longer body extending out from the thorax. Aim for a smooth feel as you twist, letting your hands guide the process.
Step 3: Cut the Wings
Choose another pipe cleaner for the wings and cut it in half to create two equal segments — each will become a wing.
Step 4: Attach the Wings
Attach one wing to each side of the dragonfly’s body. Use the end of each pipe cleaner segment to wrap around the thorax, making sure the wings are proportional.
Step 5: Add the Beads
Select beads that you find visually appealing and carefully slide them onto the twisted body. Feel the beads clink against each other — each sound adds to the sensory experience.
Step 6: Fill the Body
Continue adding beads along the body until you reach your desired length, paying attention to balance and color placement. Let your imagination guide you in choosing patterns.
Step 7: Adjust the Wings
Realign the wings if needed, adjusting their position for symmetry. This is about visual harmony — feel free to experiment until it feels just right.
Step 8: Trim the Ends
Use scissors to trim any excess pipe cleaner at the ends. Make sure the edges are smooth, avoiding any sharp points.
Step 9: Add a Hanger (Optional)
For a final touch, tie a piece of string or yarn around the thorax to create a hanging dragonfly, adjusting the length as you prefer.
Step 10: Admire Your Creation
Take a moment to appreciate your unique dragonfly. Hold it in your hands and notice how the weight and texture feel against your palm.
Enjoying the Finished Piece
Hang it on a windowsill where it can flutter in the breeze, catching the light in playful patterns. Place it on a shelf, add charm to a work desk, or give it as a playful gift. Store it in a cool, dry place when not on display, and dust gently with a soft cloth. If it ever needs a refresh, the process of taking it apart feels like a gentle reset — you can reuse the materials for something new.
Tips and Variations
- Color themes: Go nature-inspired with greens and browns, or bright and whimsical — let the colors reflect your mood.
- Add sound: Attach small bells or charms to the ends of the wings for a pleasant tinkling as they move.
- Paint first: If you enjoy drawing or painting, decorate the pipe cleaner body with designs before assembling.
- Build a mobile: Make a larger group of dragonflies to create a playful mobile, each one unique.
- Craft together: Making with children or friends multiplies the joy — encouragement and fun shared create delightful memories.
Quick Questions
What if I don’t have pipe cleaners? You can use thin wire or strips of fabric instead — anything flexible enough to hold its shape.
Can I personalize my dragonfly further? Absolutely! Glitter, stickers, or painted details make it truly one of a kind.
How long does it take? Typically 30–40 minutes, giving you time to enjoy the process without feeling rushed.
Is this suitable for children? Yes — perfect for shared family time. Just supervise scissors and small beads.
What if I make a mistake? Mistakes can be beautiful opportunities — embrace them and let them guide the next step. It’s about the process, not perfection.